
Candy Cane Cookies Recipe
I made these charming Candy Cane Cookies for a holiday cookie exchange recently, and they were an absolute sensation on the dessert platter. After twisting and baking these myself, I can tell you that combining buttery vanilla-peppermint dough with vibrant red-dyed dough creates the most delightful, festive holiday treats.
Rolling the ropes and twisting them together gives you classic candy cane shapes that look straight out of a winter wonderland bakery. I was so amazed by how effortlessly brushing the unbaked cookies with a light egg white wash and sprinkling sparkling sugar adds a magical, shimmering crystal crunch.

Ingredients
Here is everything you will need to bake these festive twisted holiday cookies, along with helpful pro tips on why each component works so well.
- 2 sticks (227g) unsalted butter, at room temperature – creams smoothly with sugar to give the cookies a rich, tender, melt-in-your-mouth bite.
- 1 cup (200g) sugar – sweetens the dough and helps create crisp, golden edges while baking.
- 1 ½ teaspoons peppermint extract – infuses the buttery cookie base with a crisp, refreshing holiday mint flavor.
- 1 teaspoon vanilla extract – rounds out the minty notes with a warm, comforting vanilla aroma.
- 1 teaspoon baking powder – gives the cookies just enough lift so they stay tender rather than hard.
- ½ teaspoon kosher salt – cuts through the rich butter and sugar to balance all the flavors.
- 1 large egg – binds the dry ingredients and butter together into a cohesive, workable dough.
- 2 ¾ cups (385g) all-purpose flour – provides the structural foundation required to hold the twisted candy cane shapes without spreading.
- 1 teaspoon liquid red food coloring – carefully mixed into half the dough to create the vibrant red candy cane stripes.
- 1 egg white & 1 tbsp water – beaten together to create a light wash that helps the sparkling sugar adhere to the cookies.
- 2 tablespoons sparkling sugar – sprinkled over top before baking to give the cookies a gorgeous, glittering snow finish.
Note: Serves 12 as a festive holiday cookie platter (yields approximately 24 cookies depending on rope size).
Variations
If you want to customize these decorative cookies for different flavor twists or dietary preferences, give these simple ingredient swaps a try.
- Chocolate Twist: Divide the dough and mix 2 tablespoons of unsweetened cocoa powder into half instead of red food coloring for a chocolate-peppermint twist.
- Almond Peppermint Fusion: Swap the vanilla extract for pure almond extract to give the buttery cookie dough a rich, nutty bakery aroma.
- Gluten-Free Option: Substitute the all-purpose flour with a 1:1 gluten-free measure-for-measure baking flour blend containing xanthan gum.
Cooking Time
Planning your holiday baking schedule is completely simple with this clear time breakdown.
- Prep Time: 30 minutes
- Baking Time: 10 minutes
- Total Time: 3 hours 40 minutes (includes 3 hours dough chilling time)
Equipment You Need
Having these essential baking tools ready before you begin will make shaping, twisting, and baking your candy cane cookies smooth and effortless.
- Stand mixer with paddle attachment – creams the butter, sugar, and extracts together into a smooth paste.
- Baking sheet & parchment paper or silicone mat – provides a non-stick baking surface that prevents the cookies from burning on the bottom.
- Pastry brush – applies the light egg white wash cleanly over the twisted cookie surfaces.
- Plastic wrap – securely wraps the divided dough disks while they chill in the refrigerator.
How to Make Candy Cane Cookies?
Creating picture-perfect candy cane cookies relies on dividing your dough, chilling it firmly, and twisting equal-sized ropes together. By brushing with an egg white wash and adding sparkling sugar right before baking, you lock in that iconic shimmering holiday look.
Making and Coloring the Dough
Place the softened butter, sugar, peppermint extract, vanilla extract, baking powder, and kosher salt in the bowl of a stand mixer. Beat until a smooth paste forms and clings to the side of the bowl. Scrape down the sides, beat in the egg until absorbed, then add the flour and mix just until combined with no dry streaks remaining. Divide the dough in half and remove one portion from the bowl. Carefully add the 1 teaspoon of liquid red food coloring to the remaining dough in the mixer and mix on low until the color is evenly distributed.
Chilling and Shaping the Cookies
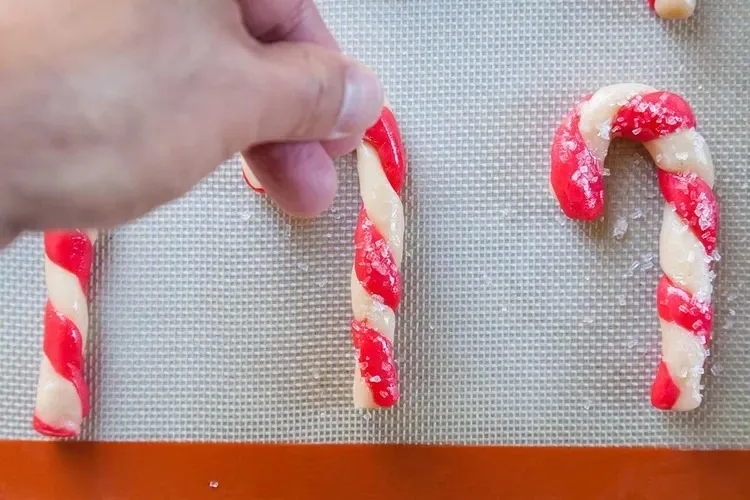
Pat each piece of white and red dough into a flat disk, wrap tightly in plastic wrap, and refrigerate for at least 3 hours or overnight. When ready to bake, preheat your oven to 350°F (175°C) and line a baking sheet with parchment paper or a silicone baking mat. Pinch off a 1-round piece of white dough and roll it into a 5-inch rope; do the exact same with a piece of red dough so the ropes match in length. Place the red and white ropes side by side and twist them together gently. Transfer to the prepared baking sheet and curve the top of the twisted dough into a candy cane hook shape, repeating with remaining dough and spacing them 2 inches apart.
Adding Sugar and Baking
Prepare the egg white wash by beating the egg white with 1 tablespoon of water until foamy. Brush the top of each shaped cookie gently with the egg white wash and sprinkle evenly with sparkling sugar. Bake in the preheated oven for 8 to 10 minutes until the edges are just barely brown. Let cool on the baking sheet for 10 minutes before transferring to a wire cooling rack. Allow the cookie sheets to cool completely between batches so the butter in the dough does not melt prematurely.

Additional Tips for Making this Recipe Better
Here are a few personal observations and tricks I learned while making these cookies that will help you achieve absolute perfection in your own kitchen.
- I always make sure the dough is still firm when shaping; if it gets too soft while working, pop it back in the fridge for 10 minutes so the ropes don’t stretch out of shape.
- In my experience, letting the hot cookie sheets cool completely between batches is non-negotiable, as hot pans cause the butter to leak out and warp the candy cane curves.
- I love pressing the twisted ends together firmly so the red and white ropes don’t separate while baking in the oven.
- Whenever I make these, I store them in a single layer or with parchment between sheets so the sparkling sugar remains crisp and intact.
How to Serve Candy Cane Cookies?
Present these festive twisted cookies arranged neatly on a holiday platter or tucked into clear cellophane gift bags tied with a red ribbon. Set them out alongside mugs of hot cocoa, spiced tea, or warm apple cider during holiday gatherings. Serve as a charming sweet treat after a family dinner or as part of an elaborate holiday cookie exchange spread.

Nutritional Information
Here is a quick overview of the estimated key nutritional metrics per serving (1 candy cane cookie) for this recipe.
- Calories: 170 kcal
- Protein: 2 g
- Carbohydrates: 24 g
- Fat: 8 g
Make Ahead and Storage
Managing your holiday baking schedule or storing leftover candy cane cookies is simple when following these easy guidelines.
Room Temperature Storage
Store fully cooled candy cane cookies in an airtight container at room temperature for up to 1 to 2 weeks. Place parchment paper between stacked layers to protect the sparkling sugar and cookie shapes.
Refrigerator Guidelines
Avoid storing baked candy cane cookies in the refrigerator, as the cool moisture can soften the crisp texture and melt the sparkling sugar coating.
Freezing Process
Freeze the unbaked shaped candy cane cookies on a baking sheet until solid, then transfer to a freezer container for up to 2 months. Bake straight from the freezer, adding 1 to 2 extra minutes to the baking time.
Reheating Instructions
No reheating needed! Always enjoy your Candy Cane Cookies straight from room temperature storage for the best crisp buttery crunch and peppermint flavor.
Why You’ll Love This Recipe?
You are going to fall in love with how effortlessly this recipe transforms basic cookie dough into a nostalgic, holiday-classic centerpiece.
- Iconic Festive Appearance: Red and white twisted stripes topped with sparkling sugar look like real holiday candy canes.
- Wonderful Peppermint Flavor: Crisp buttery texture infused with refreshing peppermint and vanilla extracts.
- Great Make-Ahead Ease: You can chill the dough in advance or freeze unbaked shaped cookies for stress-free holiday hosting.
- Fun Family Baking Project: Rolling and twisting the dough ropes is a wonderful, hands-on holiday activity to share with children and friends.